If you are planning to start the brand new project and looking for the best open-source Content Management System, then I would suggest you go with WordPress, because this is the most popular, widely used, and easy to understand CMS platform for most of the website, blog, ecommerce store owners and as well as for developers. Nowadays the future of any business mainly depends on how it has started, if any business ignores the basic features, functions, options while starting a project, then it may be a disaster. Today many web hosting service providers also recommended using WordPress CMS because they know it’s more powerful, most customized, and user-friendly platform. So today we are writing this post for beginners who want to start a new project on WordPress, this tutorial and guide will surely help you to understand How to Install WordPress Manually or Using the One-Click Auto-Installer tool. So let's get started.
Reasons Why to Choose WordPress as CMS?
Creating a first website or blog is not difficult when it comes to WordPress; all you need to do is to choose the web host carefully. WordPress installation can be done in a matter of minutes through the automatic and manual process and after that, you can start adding content, images, videos etc. instantly. WordPress offers absolutely unlimited features, functionalities, and options for websites which ensure your business achieve success without any limitation. The core features are; WordPress Themes, WordPress Plugins, SEO-Friendly, Fast and Secure, Open-Source, Full Control, Customization, Global Languages Support, Lifetime Update, and Support etc.
How to Choose the Best Web Host for WordPress?
The web hosting service provider can make or break things for your business website, blog, or store. You need to choose a quality web host for your WordPress website which offers strong support if anything goes wrong on the server side. You can consider popular WordPress hosting services which are also recommended by WordPress itself i.e. Bluehost, DreamHost, and SiteGround. If you want to first test and experiment WordPress as default CMS for your business website before purchasing any web hosting plan, then you can also consider popular and free web hosting service providers.
How to Install WordPress Manually or using 1-Click Installer? [2 Methods]
Below we are sharing two different methods through which you can install WordPress automatically and manually. It’s all depends on you, which method you want to prefer and follow. Both methods are easy to understand and don’t involve any technical knowledge for beginners. You can find more topics on WordPress guide and tutorial on 000webhost blog to further understand the working of this popular Content Management System.
How to Install WordPress using the One-Click Installer? [Method # 1]
If you are testing and experimenting WordPress CMS by using free web hosting service like 000webhost, then you can follow below steps to get started. Its worth mentioning that, following method can also be applied to any other Web Hosting Service Providers.
Step # 1: Visit 000webhost official website, and then Sign Up for your free WordPress hosting account.
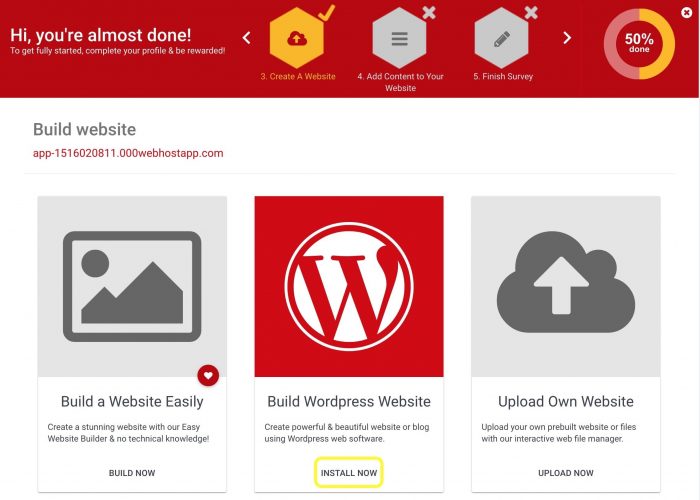
Step # 2: Login to your newly created account, you will see the following webpage. Click on "Build Website" button at top left corner. Now click the "Install Now" button under "Build WordPress Site" option.

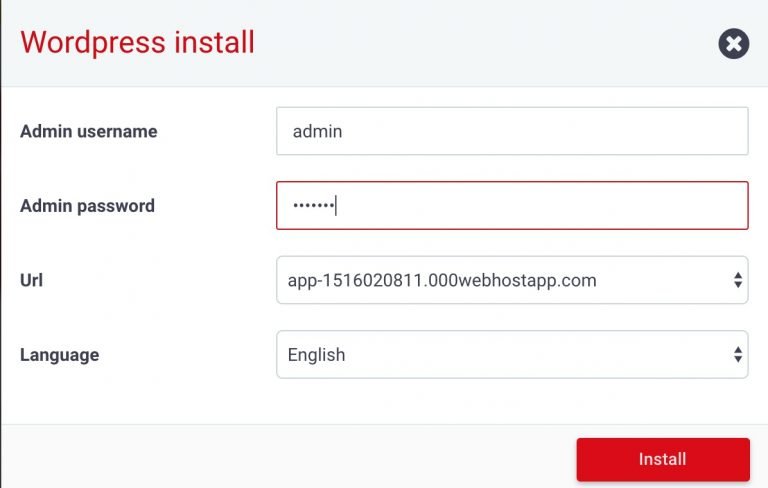
Step # 3: You will not get WordPress installation screen. Here you can choose your admin username, admin password, and prefer language. After that, click on "Install" button.
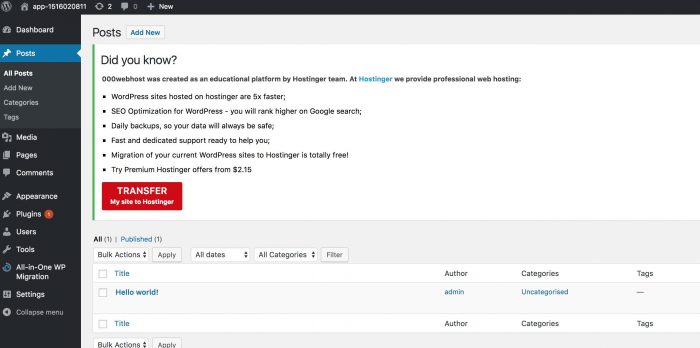
Step # 4: After installation is completed, choose "Go To The Configuration Page". Here you can enter 000webhost credentials to get access to WordPress dashboard.
How to Install WordPress Manually? [Method # 2]
This guide is for those tech-savvy users who want to learn the WordPress CMS platform more deeply. This will gives you an opportunity to further tweak WordPress installation. This will also help you in circumstances where you want to shift or change your current web hosting service provider. So let’s get started.
Step # 1: First you need to Download WordPress latest version of WordPress.org website. The WordPress installation files which you have downloaded will be in the compressed format i.e. .zip archive.
Step # 2: You first need to extract the files and then using your web hosting service provider File Transfer Protocol (FTP), you will need to upload all these files to your hosting server. If you don’t know much about FTP, then FTP is a system that allows users to download/upload website data and files from/to hosting server in a secure and fast way. We suggest you to use the popular FTP Software to do this i.e. FileZilla.
Step # 3: Download, install, and setup FileZilla software on your Windows or macOS, then you can enter your web host FTP credentials. You need to have three FTP login credentials i.e. Hostname, Username, and Password.

Step # 4: Now enter all three credentials into the corresponding fields of FileZilla software to login to your hosting server.

Step # 5: After login to your server, look for the "public_html" folder, and upload all your unzipped WordPress installation files in that folder by copying and pasting them.
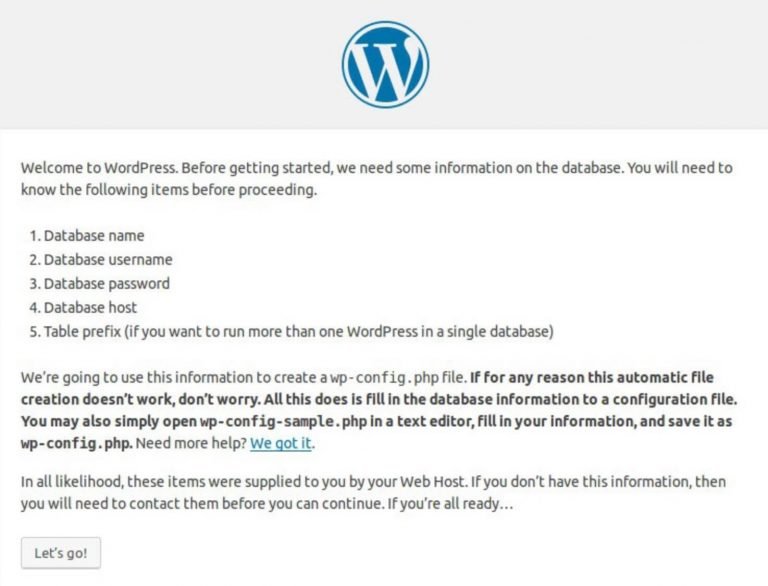
Step # 6: At this stage, you also need to ensure that you have a database for your WordPress website to store some of your website details and information. Some web hosting service providers automatically set up the database, but if not, you can also set up database yourself before moving forward.
Step # 7: Now at the final stage, you will be asked to enter some other details i.e. Website Title, Password, Username, Email, Hostname Credentials etc. After this final step, you will see the login page and WordPress dashboard will be waiting for you. You are done now!
Things To Do After WordPress Installation
You can adjust website or blog reading settings from the dashboard. You can also optimize permalink structure to define the best URL presentation to your readers. You can also setup caching on your website to ensure fast loading of your webpage. You can change default WordPress Theme to ensure the best look and feel of your website or blog. You can install several useful WordPress Plugins to get things done without any coding or technical knowledge. I would suggest you install SEO Plugin instantly to get listed on Search Engines i.e. Google Bing, and Yahoo as quickly as possible.
